Search This Blog

Monday, August 31, 2009

Redirect /owa page for Outlook Web Access

By default, in order to access Outlook Web Access, user need to key in /owa. This is troublesome and most of the time user will just type the url without http://url.com.my/owa. In this guide, i will show you how to set redirect the request to /owa for Exchange Outlook Web Access.

1. Go to Internet Service Manager (IIS), click on Default Web Site and select HTTP Redirect.


2. Tick redirect request to this destination
and enter /owa and Under Redirect Behavior, click to select the Only redirect requests to content in this directory (not subdirectories) check box.
In the Status code list, click Found (302). Lastly click Apply.

This action is for request using http://email.ms4u.info. (not applicable for SSL request)


3. If you are using certificate, you must enter https://email.ms4u.info/owa . This allow the system to redirect http request to https and then redirect to owa virtual directory.


4. After set either Step 3 and 4, you need to execute the command iisreset /noforce for the new setting to take effective.

5. On the Exchange Management Console, go to Server Configuration and Click Client Access. Select the tab Outlook Web Access and go to the owa properties.


6. Modify the Internal and External URL.


Now you can access Outlook Web Access without key in /owa..

Saturday, August 29, 2009

Configure SSL in IIS7

Here is the steps on how to get certificate in IIS7. The step is quite different compare to IIS6.

1. Using Internet Information Services (IIS), go to your server and select Server Certificate


2. On the Action Pane, select Create Domain Certificate / Self Signed Certificate


3. Enter certificate distinguished name properties


4. On the Online Certification Authority, select your CA server and certificate friendly name.


5. To set require SSL, go to Default Web Site and select SSL Settings.


6. Tick Require SSL.


7. To assign that you have created in Step 1. Go to Default Web Site. On the Action Pane, select Bindings.


8. On the site binding, select https and click Edit


9. Select the correct SSL Certicate.


You've learned how to create, configure and assign certifate to IIS7.

Email cannot send out but can receive email..

This is a true story which happened to me twice: one at customer site (a month ago) and my setup lab environment (today).
Customer is using leased line from Telekom Malaysia and i'm using Streamyx line. Both from the same Internet Service Provider (ISP).

Scenario:- Email cannot send out to Internet but can receive email.

Here is my troubleshooting step:-

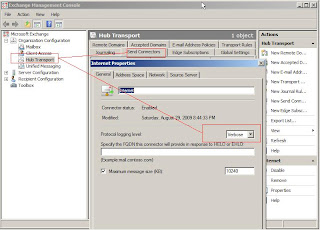
a) Enable protocol logging for SMTPSend.

Use Exchange Management Console > Organization Configuration > Hub Transport > Send Connector > On the General Tab > Change the protocol logging level from None to Verbose.


b) To view the log, go to E:\Exchange Server\TransportRoles\Logs\ProtocolLog\SMTPSend
(your path may be different depend on your installation).
Open the SEND.log files.


You will see a lot of transaction email which try to send via port 25.

I've tried to
1. ping to the destination public IP but received reply indicated the target host is alive.
2. Change dns forwarder to 4.2.2.2. Still the same problem.

Resolution:-

Telekom Malaysia has prevent sending email by using port 25 (most likely to prevent open relay/spam). You need to forward outgoing email to smtp-proxy.tm.net.my

a) To configure relay to Smart Host.
Go to Organization Configuration > Hub Transport > Send Connectors > Network Tab > Select Route mail through the following smart hosts > add > Enter smtp-proxy.tm.net.my


b) After configure the smart host, verify by going to the SMTPSend log again. You will see the successful email transaction as listed below.


Note:-

Remember to disable protocol logging level by setting to None after troubleshooting.

Wednesday, August 26, 2009

Part 104:- Configure System Center Essential Feature Configuration Wizard

Let start by looking on how to configure SCE feature configuration.

1.The feature configuration wizard is open after you click "Configure feature Configuration" . This option allow you to configure proxy server, policy type, firewall exception, remote assistance, Error monitoring, Error forwarding, Daily Health report and schedule discovery.

2. On the proxy server, you need to enter proxy setting if your environment is using proxy server in order to connect to Internet.


3. On the policy type, specify Yes,configure a domain level Group Policy" for the setting software and update deployment. You should this option, if your environment is in domain.


4. On the firewall exception, click Yes to create Firewall exception to allow agent to be installed in the managed computer. If you did not select this option, you need to manually install momagent.msi which located in the SCE CD. (eg:D:\Agent\i386\momagent.msi)


5. Select Yes, enable remote assistance.


6. On the AEM (Agent Exception Monitoring) for computer, you need to specify a share folder C:\ErrorData to collect application error from computers.


7. After collection the error, you may want to select the option Automatically forward all collected error to Microsoft. Error capture will be send to Microsoft for analysis and allow Microsoft to come out with a solution to fix the problem.


8. On Daily Health report allow you to send a daily report to administrator without visit the console everyday. Here you need to specify your email server setting.


9. Then you can specify a schedule to perform discovery for new computer and configure them to be managed. Once Unmanaged computer is discovered,an agent will be deployed and all managed policies will be applied.


10. Once all setting has define, you can click configure button to apply the setting.


You have completed the first post-configuration. Stay Tune for second post configuration setting which I will cover in next upcoming article.

Part 103:- Post configuration after installing SCE

After the SCE installation, you need to complete 3 configuration.

1. Go to Start > Program > System Center Essential 2007 > System Center Essential 2007 console to open SCE snap in.


2. On the right side, you will see Essential Configuration Incomplete. There are 3 tasks which required to configure in order to complete basic SCE configuration:

  • Configure product features. - configure SCE setting such as proxy, policy type and firewall exception.
  • Configure computers and device to manage.-set and discover computer
  • Configure Microsoft Update setting. -set software update setting


I will explore more details on these tasks on next articles.

Tuesday, August 25, 2009

Part 126:- Verify software distribution

Let start to check if your package has successful deploy to the collection.

1. To force Initiate Action, go to Configuration Manager icon in the Control panel.
- Initiate Action for


  • Machine Policy Retrieval & Evaluation Cycle
  • User Policy Retrieval & Evaluation Cycle


Wait for a while. On the bottom of right side in the taskbar, a balloon tip appeared to indicate that a program is going to install in few minute.


You can click on the ballon tip to view type of program which going to installed. You can either wait or click Run to start the installation.


2. There are several way to verify the software distribution. 1st Check on the Event Viewer.


3. On the Configuration manager, go to System Status and expand Advertisement Status. Select the package, right click and select show Messages for All.


4. The system will displayed software distribution started for Windows Vista client.


5. Another way to verify is using Reporting in the SCCM Configuration Manager.
Please refer to below figure which display the type of report that you can generate for software distribution.


6. Select Collection:- Vista with client installed.


7. Report indicated successful of package deployment to windows vista client.


That's concluded the software distribution guide.

Part 125:- Advertisement a program within software distribution

Once a package has converted to program and distribution point has defined, you can start to advertise the program to target collection. Now i will talk about last W- Who?

1. Expand software distribution and click on Advertisement. Right click, select New and choose Advertisement.


2. A new advertisement wizard is open. Enter the package name, select the package and choose your target collection which you will like to advertise your package.


3. On the schedule, select mandatory assignment is " as soon as possible" and set the priority to High.


4. On Distribution points, select the option "Download content from distribution point and run locally for client computer which connected within a slow and unreliable network boundary.


5. Customize the interaction by setting the interval to 5 minute.


6. Leave the security as default


7. Review the summary and click Next to start creating the advertisement.


8. Advertisement is created.


You've successfully created an advertisement. In the upcoming article, i'm going to verify the software distribution which i had advertise to Windows Vista collection.

Monday, August 24, 2009

OCS 2007 R2 service failed to start:-Failure [0xC3EC79E6] service failed to start as requested

Below is the error that i have encounter during the installation of OCS 2007 R2.


It indicated several problem on "Failure [0xC3EC79E6] service failed to start as requested".

To solve this problem, make sure that you install a certicate that contains the FQDN of the server name.Changing the certificate to one that has FQDN will allow the service to start.

After that, retry to start the services.

Then you will notice, all other services is started except

Service Name: RtcQmsAgent
Descriptive Name: Office Communications Server Monitoring Agent
Failure
[0xC3EC79E6] Service failed to start as requested

Solution:-
Go to Features and add Message Queue features.It is a missing pre-requisite for the Monitoring server role in Windows Server 2008. Now my OCS 2007 R2 service started successfully.

Part 102: Installing System Center Essential 2007 SP1

In this guide, you will start to install SCE. I'm assume that you've refer to Part 101: SCE Pre-requisite before proceed with this guide.

1. Start by putting the CD. A splash screen System Center Essential 2007 Setup is open. Click on Full Setup on Install category.


2. Welcome wizard is open.


3. The wizard will perform pre-requisite installation to check your system. As you have refer to my previous guide, your system will pass the pre-requisite checker.


4. On the EULA license, accept the license agreement.


5. Enter your information and product key on the registration information.


6. On the installation option, specify the location of installation path and update file path.


7. On the SCE database, select option Use an exisiting local SQL Server instance and select database server.


8. On the SCE Reporting , select the server where you've install SQL Reporting features.


9. On the Administration Account, enter SCEAdmin which assign to domain admin rights. This account will use to gather operational data and perform actions such as installing and uninstalling agents on a managed computers.


10. Tick all error and usage reporting.


11. Review the summary before start the SCE installation.


12. Installation in progress.


13. On the Microsoft Update, click Visit Microsoft Update button to get the updates.


14. You will receive confirmation once the system is successfully installed SCE.


The system will prompt you to backup the encryption key as similar in Part 104:- SCOM. Please refer to that arcticle by click here .
If you encounter any problem during installation, pls proceed to %temp% directory and refer to this log files:- scereportingx.log and scesetupx.log

In next article, i will go through the post configuration for SCE 2007 SP1.

Stay Tuned...