Search This Blog

Showing posts with label VDI. Show all posts

Thursday, October 31, 2013

Run Hyper-V Manager, MS Visio and MS Project from Surface RT or Nexus 7 FHD Using Presentation Virtualization


I have playing around with my new Surface for quite some time. Really love the feel of the touch screen and Windows 8.1 RT. It’s preloaded with MS Outlook 2013, MS Word 2013, MS Excel and MS Power Point. Great application for people who are always on the move but I find it a bit lacking especially as a consultant, I need to always use Hyper-V Manager snap-in to remote into customer environment and manage multiple virtual machines, MS Project to do project scheduling for customer and MS Visio for drawing virtualization architecture. But guess what Surface RT cannot install application except app from MS Store?

How about my Nexus 7 FHD? Even worse, no MS Office application unless I’m using Quick Office which don’t give me similar function as MS Office.

It come to the the point that my this small laptop bag need to carry 3 devices: DELL Laptop, Nexus 7 FHD and Surface.

laptopbag

When at customer place, customer surprise with how many gadget that I carry when go to work. Hey!… I’m an IT Guy!

myworkplace

So next question is how do I solve my problem and get the following program inside my Surface?

  • Hyper-V Manager snap-in
  • MS Visio 2013
  • MS Project 2013

Interest to know more, please continue reading….

1st step:-

  • Setup RDS Session Host –Windows Server 2012 R2 on a Virtual Machine

image

2nd step:-

  • Enable features Hyper-V Manager snap-in , install MS Office 2013 Application, MS Project 2013 and MS Visio 2013 on RDS Session Host.

3rd Step:-

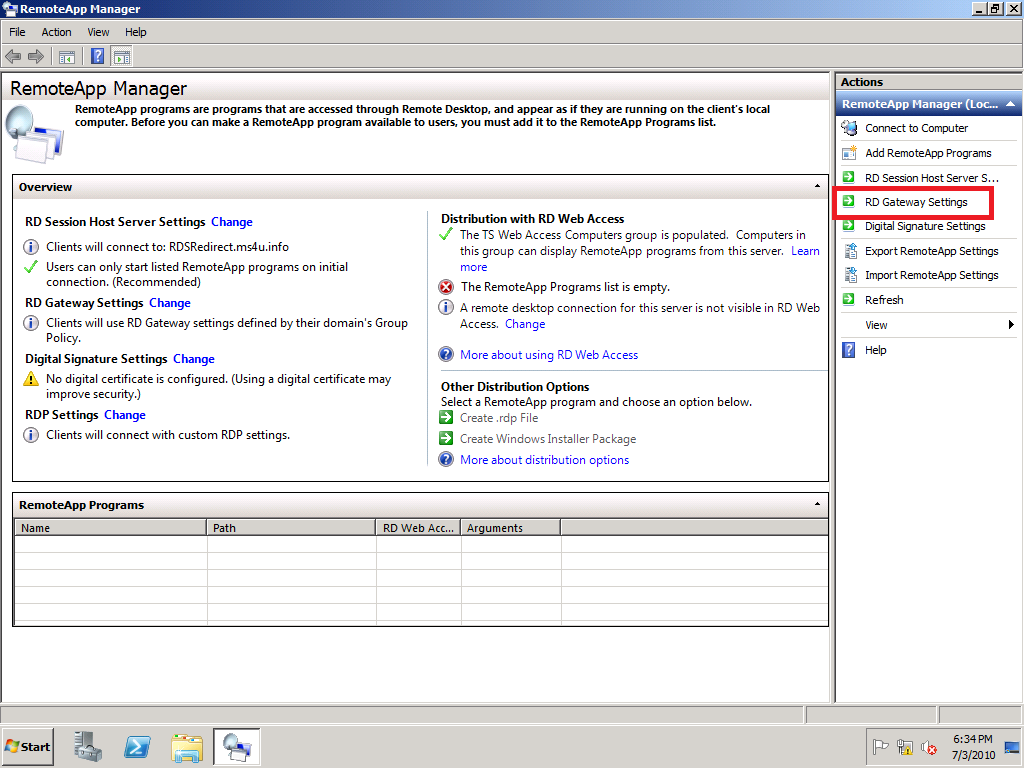
  • Configure and Publish RemoteApp on RDS Session Host

2

3

4th Step:-

  • Verify using Internet Browser. I’ve create a group : Office App which contained the entire MS Office 2013 Application

7

8

Now the fun part on testing using Surface from LAN / Internet:-

  • LAN – use Ethernet or wireless connection
  • Internet – use VPN / Direct Access back to office

On Surface

5th Step:

Configure RemoteApp and Desktop Connection URL on Surface

image

image

Once connection established, you will able to see your entire RemoteApp program at Start. Here is how it look like (red box)

image

Hyper-V Manager snap-in on Surface:-

image

All application work great!

Last test on Nexus 7 FHD (running android 4.3)

1st Step:-

  • Use MS Remote Desktop Client App for Android and Configure your RDS Session Host settings.

image

2nd Step:-

  • Connect to RDS Session Host. RemoteApp displayed on the android 4.3.

image

3rd Step:-

  • Test MS Project 2013 Application running on Nexus 7 FHD (android 4.3)

2013-10-31 10.48.11

Updated: [31 Oct 2013]

Just installed Google Chrome on RDS and enable user profile disk in Windows Server 2012 R2. User profile disks store user and application data on a single virtual disk that is dedicated to one user’s profile.

It is working fine as well.

Now I can bring either Surface or Nexus 7 FHD everywhere without worrying about application. Just get my application installed on RDS Session Host and with Internet access I would be able to work anywhere & anytime.

Friday, October 18, 2013

Remote Desktop App For Android and iOS


Yesterday during Microsoft Cloud OS Day Event @ Singapore, I have saw a demo of Remote Desktop App on iOS during keynote. Guess what? Today Microsoft has started to release the app to public and this is what I saw on my Nexus 7 FHD Play Store.

2013-10-18 09.37.07

Quick preview on how it look like on Android:- (click the image to view)

b) Enter your corporate detail for Remote Desktop

2013-10-18 09.37.30

b) Windows 8.1 on Android

2013-10-18 09.38.13

2013-10-18 09.38.55

2013-10-18 09.38.22

2013-10-18 09.39.47

c) RDS application

2013-10-18 09.39.00

Remote Desktop for iOS and Android is now available to download for free, and the links provided below will take you to the download page.

Download:

Wednesday, November 21, 2012

Demo VDI and RDS in Windows Server 2012


Follow up on my previous post after talking about App-V 5 and my yesterday session about Windows 8 Virtualization. Therefore, in today article, i will post a video about my demo during Microsoft Techday 2012 (Malaysia). When i recorded this video, there is no audio recording enable therefore here is a short description about each video. Some guidelines:-

  • Click Full Screen
  • Click Change Quality and set to 480p
  • View nicely in tablet Nexus 7.

Video 1:-

Centralized Management using Server Manager to manage Remote Desktop Services. In the past we got 4 different console to manage RDS, but with Windows Server 2012, you only have 1 console which is Server Manager. I have deployed RD Web Access, RD Connection Broker, RD Virtualization Host and RD Session Host. 4 collection has created :- 1 for Application in the VM Pool, 1 for Remote Desktop Session Host, 2 for VM Pool running Windows 7 and Windows 8. Besides, i also show on how to publish an application which is running in VM into RD Web Access.

Video 2

Access to RD Web Access and able to view group of application and console published in RD Session Host and Application from VM Pool. With Windows Server 2012, now you can group multiple application into Folder and display in RD Web Access.

Video 3

Showing access to Pool VM which is running Windows 8 Enterprise. Walkthrough on Start screen, make the tile smaller/larger, arrange the tile, group the tile and open facebook photo using Win 8 Photo App which is showing Legoland Malaysia.

Video 4

Access to pool VM and try to play video USB thumb drive which i just plug from my laptop. I was able to video the USB thumb drive and access to content. Try to play one of video using Win 8 Video App but failed. It is because the app cannot play *.3gp format. Therefore, i access to App-V 5 new management console using web browser and publish 3 application:- winrar, VLC player and Firefox browser. After publish, i use the modern UI App-V 5 client to get the updated virtual application. Now i was able to play the *.3gp format by using VLC Virtual Application.

Related post:

Monday, July 4, 2011

Windows Thin PC RTM


First i wish:-

“Happy Independence Day- 4th July” to United Stated visitor.

Next:-

VDI customers, time to turn your refurbish PC/desktop/laptop into thin client with Microsoft latest Windows Thin PC running Windows 7. It is included with Remote FX support, write filters, BitLocker and AppLocker, and FEP support, which makes it possible to use a common set of malware protection tools for your desktops and thin clients.

If you are not a Software Assurance (SA) customer but would still like to try out Windows Thin PC, Microsoft provides the following list of possibilities:

1. You can download the 90 day evaluation copy that can be accessed via the Windows Thin PC home page. Click here to start evaluate.

2. If you are a subscriber to our MSDN and TechNet programs you can also get the full copy of the product through your subscription.

3. If you are part of the silver and gold partners in the MPN program you have access to the full product as part of the desktop and virtualization competencies.

4. You can get SA on your PCs by either subscribing to Windows Intune or Windows VDA. Both these subscriptions include SA benefits, including the right to Windows Thin PC.

For information, please visit :-http://www.microsoft.com/windows/enterprise/solutions/virtualization/products/thinpc.aspx

I’ve personally tested running on Hyper-V. More detail, click here

Wednesday, November 10, 2010

Part 10 - Building VDI using Remote Desktop Services (RDS)

Sorry visitor. It has been a while since i posted part 9. Let move to another part.

Update on the link from previous articles:-

Part 1: Overview and Initial Configuration
Part 2: Install RD Roles
Part 3: Win7 Guest VM Configuration
Part 4: RD Session Host Configuration
Part 5: RD Connection Broker
Part 6: PersonalVirtual Desktop (Static)
Part 7: Virtual Desktop Pool (Dynamic)
Part 8: RD Web Access Configuration
Part 9: WinXP Guest VM Configuration


Here is Part 10 of Building VDI using Remote Desktop Services (RDS) which will focus on configuring RDS Gateway.

Task 1:- Add RDSGateway into Remote App Manager of RD Session Host (Redirector)


1. Go to RDSRedirect VM.
2. Open Remote App manager by clicking Start > Administrative Tools > Remote Desktop Service > Remote App Manager
3. On the Action pane, click RD gateway Setting.


4. On the RDGateway tab, click use these RD Gateway Server setting

a. Enter: RDSGatewayWeb.ms4u.info
b. Logon method: Always use Password.

Tick "Use the same user credentials for RD Gateway and RD Session Host server."


5.Click Ok button

Task 2:- To export the SSL certificate for the RD Gateway server and copy it to your client computer


1. On the RD Gateway server, open the Certificates snap-in console. If you have not already added the Certificates snap-in console, you can do so by doing the following:
2. Click Start, click Run, type mmc and then click OK.
3. On the File menu, click Add/Remove Snap-in.
4. In the Add or Remove Snap-ins dialog box, in the Available snap-ins list, click Certificates, and then click Add.
5. In the Certificates snap-in dialog box, click Computer account, and then click Next.
6. In the Select Computer dialog box, click Local computer: (the computer this console is running on), and then click Finish.
7. In the Add or Remove snap-ins dialog box, click OK.
8. In the Certificates snap-in console, in the console tree, expand Certificates (Local Computer), expand Personal, and then click Certificates.
9. Right-click the certificate RDSGatewayWeb.ms4u.info, point to All Tasks, and then click Export.


10. On the Welcome to the Certificate Export Wizard page, click Next.

11. On the Export Private Key page, click No, do not export private key, and then click Next.


12. On the Export File Format page, ensure that DER encoded binary X.509 (.CER) is selected, and then click Next.


13. On the File to Export page, in the File name box, click Browse.

14. In the Save As dialog box, in the File name box, enter RDSGateway, and then click Save.
15. On the File to Export page, click Next.
16. On the Completing the Certificate Export Wizard page, confirm that the correct certificate is specified, that Export Keys is set to No, and that Include all certificates in the certification path is set to No, and then click Finish.
17. After the certificate export has successfully completed, a message appears confirming that the export was successful. Click OK.
18. Close the Certificates snap-in.
19. Copy the RD Gateway server certificate (RDSGatewayWeb.cer) to the your client computer

Task 3: To install the SSL certificate for the RD Gateway server on your client computer


1. Log on to client computer .
2. Right click the RDSGatewayWeb.cer and select Install Certificate.


3. On the Welcome to the Certificate Import Wizard page, click Next.

4. On the Certificate Store page, select Place all certificates in the following store - Trusted Root Certification Authorities, and then click Next.
5. On the Completing the Certificate Import Wizard page, confirm that the correct certificate has been selected and that the following certificate settings appear:
• Certificate Store Selected by User: Trusted Root Certification Authorities
• Content: Certificate


6. Click Finish.

7. A security warning dialog box appear. Click Yes to confirm the certificate installation.


8. After the certificate import has successfully completed, a message appears confirming that the import was successful. Click OK.

9. Log off from the client computer.

Task 4:-: Verify VDI Functionality


1. On any client computer, use Internet Explorer and key in https://rdsgatewayWeb/rdweb
2. To test personal virtual desktop
a) Enter : ms4u\vdiuser1 with the password: P@ssw0rd
b) Click Sign in
c) You will see "My Desktop" and 'Windows 7 Client Pool".
d) Click My desktop
e) Click Connect
f) Enter the authentication again. Key in ms4u\vdiuser1 with the password: P@ssw0rd

To test virtual desktop pool
a) Enter: ms4u\vdiuser2 or vdiuser3 with the password: P@ssw0rd
b) Click Sign in
c) You will see "Windows 7 Client Pool"

Task 5: To connect to RDSRedirect with RDC by using RDSGatewayWeb -(applicable for Personal Desktop Pool) - In LAN only can use IP.

1. Click Start, point to All Programs, point to Accessories, and then click Remote Desktop Connection.
2. In the Remote Desktop Connection dialog box, click Options.
3. On the Advanced tab, click Settings.
4. On the RD Gateway Server Settings page, click Use these RD Gateway server settings, enter the following settings, and then click OK.

• Server name: RDSGateway.ms4u.info
• Logon method: Ask for password (NTLM)
• Bypass RD Gateway server for local addresses: Clear check box

5. On the General tab, in the Computer box, type RDSRedirect.ms4u.info, and then click Connect.
6. In the Windows Security dialog box, type the password for ms4u\vdiuser1, and then click OK.
7. If the connection is successful, a Windows desktop will appear on the screen

That's all folk. Wish you good luck on setting up VDI using RDS Technology.

Wednesday, October 13, 2010

Citrix XenDesktop 5 with Hyper V R2

For the pass few days, i have been busy attending training. Guess what?


It's Citrix XenDesktop 5 which announced at Citrix Synergy 2010 Berlin (last week) which will ship by the end of the year 2010. Among several selected people, we had been train to use the latest Citrix. Since it is not yet release as production, i would not share the step by step instruction. However a high overview of the class setup during the training.

Here is our setup environment:-

A machine installed with Hyper V R2 with the following Virtual Machine:-

a) Active Directory
b) VMM 2008 R2
c) Citrix XenDesktop 5 (DDC)
d) Win7Base (as master image)
e) Citrix XenApp

The entire environment is in domain environment and a DHCP is setup inside the Active Directory. Meanwhile, Citrix deployment is using Quick Deploy.

Backend infrastructure
Using Active Directory, Microsoft Hyper V R2 and VMM 2008 R2.

DDC VM
If you're familar with XenDesktop 4, supported operating system for DDC is Windows Server 2003. With XenDesktop 5, DDC can install in Windows Server 2008 or 2008 R2.

Quick Deploy is suitable in small environment and the entire Citrix component is installed into DDC VM. For those familar with Citrix XenDesktop 4, you will find the installation of Citrix XenDesktop 5 is easy. During the installation, Xendesktop Controller, Web Access, Desktop Studio, Desktop Director and License Server is installed.

You need to install VMM Administrator Console into this VM as well before establish a connection.

The following is setting that you to perform:-

a) Set Site Name
b) Establish Connection to VMM
c) Specify VM storage location.
d) Select Win7Base image
e) Configure pool image.

Win7Base VM

On the Win7Base VM, VDA agent is installed. Once done, offline the VM.

DDC will use VMM to create snapshot and multiple pool images.

There's a redesigned & brand-new administrative console called "Desktop Studio," which is where administrator will build, test, deploy, roll back images, create assignment, create policy, etc.

Lastly, not to forget a brand new web based helpdesk console called "Desktop Director". Now, you can delegate different roles to the user based on management tasks. These roles are designed to fit with the typical IT structure in an enterprise. For example, a user can be granted Read Only access to the XenDesktop site and use the Desktop Director at the Help Desk.

XenApp VM
Besides than Citrix XenApp, you need to install RDS Session Host. XenApp allow you to publish application into Citrix Web Access and inside the VM. The concept is similar as RD Session Host and RD Web Access.

To access the VDI and XenApp application, you can use Web browser.The web interface has changed to white background.

As a conclusion, a lot of cool stuff in Citrix XenDesktop 5 and XenApp during our lab environment. Hope to share more but it's still too soon as currently it is in beta stage.

To learn more about Citrix XenDesktop 5, feel free to visit http://community.citrix.com/display/ocb/2010/10/06/FREE+Citrix+XenDesktop+5+training+now+available%21

Tuesday, October 5, 2010

Part 9 - Building VDI using Remote Desktop Services (RDS)

Update on the link from previous articles:-


Part 1: Overview and Initial Configuration
Part 2: Install RD Roles
Part 3: Guest VM Configuration
Part 4: RD Session Host Configuration
Part 5: RD Connection Broker
Part 6: PersonalVirtual Desktop (Static)
Part 7: Virtual Desktop Pool (Dynamic)
Part 8: RD Web Access Configuration

Here is Part 9 of Building VDI using Remote Desktop Services (RDS) which will focus on configuring Guest VM which running on Windows XP. If you refer to Part 3, i'm focused on configure for Windows 7. Now how about Windows XP?

After the XP virtual machines are installed and configured for the ms4u.info domain, you must configure them to work with Remote Desktop Services. The following steps must be configured on each virtual machine:


Task 1: Enable Remote Desktop.
1.Click Start, click Control Panel, and then click Performance and Maintenance
2.Click System
3.Click the Remote tab, select the Allow users to connect remotely to this computer check box, and then click OK

Task 2: Windows Firewall set up to allow exceptions
1.In the Control Panel, click Security Center
2.Under Manage security settings for, click Windows Firewall
3.Make sure the Don't allow exceptions check box is not selected.
4.Click the Exceptions tab, and verify that the Remote Desktop check box is selected.
5.Click OK, and then close the Windows Security Center window.

Your host computer is now set up to allow remote access.

Task 3: Execute Script.
1. Copy the script XPVDI-Client.vbs from http://cid-847c7d34b429ad95.skydrive.live.com/redir.aspx?resid=847C7D34B429AD95!214 and execute inside the XP Virtual Machine.
 
Task 4- Enable Rollback on a virtual machine


Once you've complete all the configuration, you need to enable rollback. This allow VM to revert to original state once the user has log off. No data is saved into the VM. Please do not save your data inside the VM.

1. Open Hyper-V Manager. To open Hyper-V Manager, click Start, point to Administrative Tools, and then click Hyper-V Manager.
2. Under Virtual Machines, right-click VDI01-WinXP.ms4u.info, and then click Snapshot.
3. Under Snapshots, right-click VDI01-WinXP.ms4u.info, and then click Rename.
4. Type RDV_Rollback and then press ENTER. (Must use the exact snapshot name)
5.Cose Hyper-V Manager.

Task 5 - Verify Remote Desktop
1. Use your client computer and Open Remote desktop connection. Click Start , on the search program and files , enter "mstsc" and press Enter
2. Key in "VDI01-WinXP" (XP VM Computer name)and click Connect
3. Provide security authentication by enter username: -ms4u\vdiuser1 and the password is P@ssw0rd.
4. Click Ok
5. Make sure you can log on to the VM.

Click here for Part 10:- Building VDI using Remote Desktop Services (RDS)

Sunday, September 19, 2010

Part 8 - Building VDI using Remote Desktop Services (RDS)

Update on the link from previous articles:-
Part 1: Overview and Initial Configuration
Part 2: Install RD Roles
Part 3: Guest VM Configuration
Part 4: RD Session Host Configuration
Part 5: RD Connection Broker
Part 6: PersonalVirtual Desktop (Static)
Part 7: Virtual Desktop Pool (Dynamic)


Here is Part 8 of Building VDI using Remote Desktop Services (RDS) which will focus on configuring RD Web Access. Almost complete the configuration.

Without wasting anymore time, let look into the configuration
1. Log on to RDSGatewayWeb VM with administrative rights.
2. Open Remote Desktop Session Host Configuration snap in. Click Start, Administrative Tools, Remote Desktop Services, Remote Desktop Web Access Configuration

3. Log in to Remote Desktop Web Access with administrative rights

Enter
      username: ms4u\administrator
      Password:  P@ssw0rd


You must sign in using administrative right to perform the configuration in RD Web Access.

4. Click Sign in button

5. On configuration, select an RD Connection Broker server as the source to use and enter the name RDSBroker.ms4u.info


6. Click OK button


7.Click on sign out button.
 
Quite simple and straight forward.  click here for part 9.

Monday, September 13, 2010

Part 7- Building VDI using Remote Desktop Services (RDS)

Update on the link from previous articles:-


Part 1: Overview and Initial Configuration
Part 2: Install RD Roles
Part 3: Guest VM Configuration
Part 4: RD Session Host Configuration
Part 5: RD Connection Broker
Part 6: Personal Virtual Desktop (Static)

Here is Part 7 of Building VDI using Remote Desktop Services (RDS) which will focus on Virtual Desktop Pool (Dynamic deployment) Configuration.

In the Virtual desktop deployment, it is not necessary to put the VM as FQDN. From here you can different between Personal Virtual Desktop and Virtual Desktop Pool.

For customer who cannot upgrade the schema to Windows server 2008, then this is the only option to select. I have tested this deployment when running on Active Directory schame is on Windows Server 2003.

Dynamic Virtual Desktop is not a 1 to 1 mapping. If you have 100 users and only 50 users which is actively use the VDI, you can create 70 Virtual Machine in the pool. (just my estimation to include 20 Virtual Machine as a buffer). User will access to any virtual machine which is available on the pool. The entire virtual machine is install with the same program and same setting. Besides that, any changes make by the user will be lost after their log off. In this deployment, i recommend that you deploy roaming profile and folder redirection to overcome this issue.

When using this deployment, you will need to use differencing disk for the client VM. In essence, you need to have a base image which contain the client operating system and standard application which we called it as "master image". Then for the VM, create a differencing disk and map to the master image.  Follow the instruction on Part 3:- http://www.ms4u.info/2010/04/part-3-building-vdi-using-remote.html to prepare the client VM for VDI. Once you have done that, create a snapshot and name it as "RDV_Rollback". Remove unncessary name give by the snapshot. The system will automatically revert to initial state once the user is logoff.

Now let look into the configuration on the RD Connection Broker for Virtual Desktop Pool.

1. Click on Create Virtual desktop Pool on the Action pane.


2. Review the Welcome to Create Virtual Desktop Pool wizard and click Next button.

3. On select Virtual Machine, use CTRL to select multiple virtual machine. In case environment, select VDI02-Win7 and VDI03-Win7. (Ignore the FQDN, Dynamic deployment do not need to rename the VM as FQDN as i mentioned previously)


4. Click Next button
5. On set Pool properties, Enter
a) Display name:- Windows 7 client pool
b) Pool ID: - VDIWin7.


6. Click Next button

7. Review the result and click Finish.

That will do. At this moment, you have successful configure static and dynamic deployment. Click here for Part 8 to learn how to configure RD Web Access.

Thursday, September 9, 2010

Part 6- Building VDI using Remote Desktop Services (RDS)

Since i have released a step by step instruction till Part 5 (last post on  May 2010), i have forgetten to release Part 6 until recently i received an email from Robert. Not to dissapoint any visitor which follow this articles from beginning, i will continue to release the rest of Part.

To refresh your memory, click on below link for previous Part.
Part 1: Overview and Initial Configuration
Part 2: Install RD Roles
Part 3: Guest VM Configuration
Part 4: RD Session Host Configuration
Part 5: RD Connection Broker

Here is Part 6 of Building VDI using Remote Desktop Services (RDS) which will focus on Personal Virtual Desktop Configuration.

To deploy personal virtual desktop or most of the time we called as "static virtual desktop deployment", you need to has
a) Active Directory Schema upgraded to Windows Server 2008.
b) Client virtual machine running Windows XP or Windows 7 need to use FQDN in Hyper V Manager snap-in.

Static Virtual Desktop is a 1 to 1 mapping. If you have 100 users, then you need to create 100 Virtual machine. User will access to their own unique virtual machine and have greater control. Besides that, changes on the Virtual machine will maintain in the Virtual Machine. This concept is similar as their own desktop environment.

Task 1: Personal Virtual Desktop Configuration.
1. Click on Configure virtual desktops on the top right of the Action pane.


2. Review before you begin page and click Next
3. Verify RDSVH is listed on Specify an RD Virtualization Host Server and click next. For my case, my RDSVH computer name is "LAINB.ms4u.info)


4.Verify RDSRedirect is listed on Configure Redirection Settings and click Next.


5. Click Next on RD Web Access Server.


6. Click Apply button.


7.Review the summary page and make sure Assign personal virtual machine is tick and click Finish button.


8.On the Assign Personal Virtual Desktop page, click Select user.
9. Enter Vdiuser1, Click Check name and click OK
10. On the virtual machine, select VDI01-Win7 and click Next


11.Review the confirm assignment and click Assign.


12.On the assignment summary page, uncheck assign another virtual machine to another user
13.Click Finish

Stay tuned for Part 7:- Building VDI using Remote Desktop Services (RDS) - Click here . I will cover on how to create Virtual Desktop Pool/ Dynamic VM Deployment.

Saturday, September 4, 2010

Microphone Support on VDI Using RDS

I have encountered microphone issue when performing Proof of Concept (POC) to a customer. Here is the scenario that i would like to share.

Scenario:
When you access VDI Virtual Machine running on Windows XP and Windows 7, you will be able to get audio from the machine that you use to access but no microphone detected. Please refer to below figure (on the Recording tab):


By default, Windows 7 VM running in Hyper V does not have Sound driver. You will get audio redirection from the client computer. Same scenario happen to Windows XP Professional.

Now why still no microphone ?

Here is the finding that i would like to share:-

a) No Audio Redirection Recording for Windows XP VM. Please refer to statement mentioned in http://support.microsoft.com/kb/969084 .Even with RDC 7.0 install into the VM, this feature will not available to Windows XP VM as XP does not support audio recording redirection.

b) Audio Recording Redirection only available when virtual machine client operating system running on Windows 7 Enterprise / Ultimate/ Professional Edition.

c)By default, remote audio recording is disable on rdp file. Make sure you select "Record from this computer" or modify the rdp file to include


"audiocapturemode:i:1". You can put this value into RD Connection Broker server role under virtual desktop pool custom rdp setting as well.


To make life easier for the administrator, enable "Allow audio recording redirection" Group Policy setting. You can modify in
Computer Configuration\Policies\Administrative Templates\Windows Components\Remote Desktop Services\Remote Desktop Session Host\Device and Resource Redirection\Allow Audio recording redirection.


d) On the Windows 7 VM, modify the registry
HKLM\SYSTEM\CurrentControlSet\Control\Terminal Server\WinStations\RDP-Tcp

fDisableAudioCapture REG_DWORD to 0. If you're running Windows Server 2008 R2 domain controller, you can use group policy to replace the registry value in Computer Configuration |Preferences | Windows Settings | Registry. (refer to below figure). For more detail, please refer to http://support.microsoft.com/?kbid=2020918


e) Enable Audio Recording redirection in RD Session Host Server.


At this moment, here is my test result after above configuration:-

Test result on 4th Sept 2010:-
a) Win7 to Win7 VM - Audio and Recording - Passed
b) WinXP with SP3 (install with RDC7) to Win7 VM - Audio and Recording - Passed
c) WinXP with SP3 (install with RDC7) to Win XP with SP3 (install with RDC7) - Audio Passed but Recording -fail to detect.
d) Win7 to WinXP with SP3(install with RDC7) - Audio Passed but Recording -fail to detect.

Here is some additional finding on connectivity and feature support: http://blogs.msdn.com/b/rds/archive/2009/08/21/remote-desktop-connection-7-for-windows-7-windows-xp-windows-vista.aspx

Will update again once i rerun multiple test. Stay Tuned.