Search This Blog

Tuesday, April 27, 2010

Part 4:- Building VDI using Remote Desktop Services (RDS)

Here is the Part 4 of Building VDI using Remote Desktop Services (RDS). For those who has missed Part 3, please click on this link :- http://www.ms4u.info/2010/04/part-3-building-vdi-using-remote.html

Continue from Part 3. This part will focus on RD Session Host Configuration

Task 1: Enable Remote Desktop and Add VDIGroup to the local Remote Desktop Users group


1. Log on to RDSRedirect VM with administrative rights.
2. Click Start, right-click Computer, and then click Properties.
3. Click Remote settings.
4. Under Remote Desktop, click Allow connections only from computers using Remote Desktop with Network Level Authentication (more secure), and then click Apply
5. Click on select Users button
6. On the Remote Desktop Users, click Add
7. Enter VDIGroup and click Check name
8. Click OK button to close the Remote Desktop Users
9. Click OK button to close the System Properties

Task 2: Add RDSBroker to the TS Web Access Computer group

1. Log on to RDSRedirect VM with administrative rights.
2. Open Computer Management. Click on Start > Administrative Tools > Computer Management.
3. Expand Local Users and Group and Groups
4. Double click TS Web Access Computer and Click Add button
5. Click on Object Types and Tick Computers and click OK
6. Enter RDSBroker and Click Check name
7. Click OK to close the select Users, Service Account and Group
8. Click Ok to close the TS Web Access computer properties


Task 3: Add RDSRedirect to the Session Brokers Session

1. Log on to RDSBroker VM with administrative rights.
2. Open Computer Management. Click on Start > Administrative Tools > Computer Management.
3. Expand Local Users and Group and Groups
4. Double click Session Brokers Computers and click Add button
5. Click on Object Types and Tick Computers and click OK
6. Enter RDSRedirect and Click Check name
7. Click OK button
8. Click OK to close the Session brokers Computers


Task 4: Configure RDSRedirect for virtual machine redirection mode.

1. Log on to RDSRedirect VM with administrative rights.
2. Open Remote Desktop Session Host Configuration snap in. Click Start > Administrative Tools > Remote Desktop Services > Remote Desktop Session Host configuration
3. Scroll down to RD Connection Broker , Right click Member of farm in RD connection broker and select Properties

4. On the RD Connection Broker tab and click change setting.

5. Select option Virtual machine redirection
6. Enter the RD Connection Broker server name: RDSBroker.ms4u.info and click OK

7. Click Yes


8.Click OK

Stay tuned for Part 5:- Building VDI using Remote Desktop Services (RDS) - Click here

Thursday, April 22, 2010

Microsoft Virtualization Summit 2010 (Malaysia)

Ever wonder, why this month my blog has less article?

Well, I have been busy setup the infrastructure for Microsoft Virtualization Summit 2010 (Malaysia)
This event start on
Date: 22 April 2010
Time: 9.00 - 6.00 pm
Venue: Monash University, Malaysia.

Finally it is over.... I had been busy since last 10 days to prepare for Microsoft Virtualization Summit 2010 (Malaysia).  I, Tee and Ow, the committee member of MVUG had struggle hard to setup the infrastructure for this event.
Here is the setup diagram for the infrastructure: -

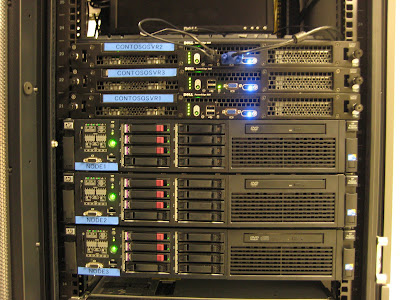
We had setup one (1) set of three (3) nodes cluster and one (1) set of two (2) nodes of cluster on Windows Server 2008 R2- Hyper V. With five (5) iSCSI storage (Dell EqualLogic, HP Lefthand, Hitachi, Compellent and Windows Storage Server 2008) are connected to these two set of cluster. It's really a challenge. Each servers consist of 8 NICs and the remaining five(5) servers are installed as standalone Hyper V host. Total servers involved on this setup is 10 units and eight (8) units of HP Procurve (switch).

We managed to get it up with Failover Cluster, Live Migration, Quick Storage Migration, VDI with RDS, SCVMM, SCOM and DPM 2010.

The 1st Cluster is running VDI with Remote Desktop Services
The 2nd Cluster is running Stock Server running on .Net and SQL database.

For the solution showcase, we managed to demo
-Live Migration with Stock Application. (Line of Bussiness) Application
-Quick Storage Migration
-VDI with Remote Desktop Services
-Backup Hyper V VM with DPM 2010 

Picture:- Tee (middle), Ow (Left), Me (Right)
Server:-
Storage:-

Rack:-
Switches:-
For more photo of our setup, please click on below link

Enjoy! While i'm taking a nap...

Sunday, April 18, 2010

Demo:- Software Update using System Center Configuration Manager

Hi.


Here is a demo about Software Update using System Center Configuration Manager which i have prepared for MVUG April 2010 meeting.
To join our communities, pls go to http://www.facebook.com/group.php?gid=216237734803  .

To view in another windows, please click into the video.
 
Demo:- System Center Configuration Manager -Software Update(Part1)


Demo:- System Center Configuration Manager -Software Update(Part2)

Tuesday, April 13, 2010

Demo:- Offline Virtual Machine Servicing Tools

Hi.


Here is a demo about Offline Virtual Machine Servicing Tools which i have prepared for MVUG April 2010 meeting. To join our communities, pls go to http://www.facebook.com/group.php?gid=216237734803  .

To view in another windows, please click into the video.


Not interest on the demo, please refer to http://www.ms4u.info/2010/02/offline-virtual-machine-servicing-tool.html for the article about Offline Virtual Machine Servicing Tool.

Enjoy!

Thursday, April 8, 2010

Shared ISO files in VMM for Cluster Hyper V

Hi,

Most of you should familar with share ISO feature in VMM. I have wrote about this on previous article. If you forget, please feel free to check on here:-http://www.ms4u.info/2009/10/share-image-file-instead-of-copying-it.html

Now the question is Why I blog again about this topic? Well, previous step by step configuration is applicable for stand alone Hyper V host. How about Clustered Hyper V host?

In my scenario, i have
Node 1 - Cluster node 1
Node 2 - Cluster node 2
HvCluster - Cluster name

On the VMM library share + NTFS permission, add Node1, Node2 and HVCluster with Read permission.
The VMM Library Default share is located in


C:\ProgramData\Virtual machine Manager Library Files

Modify the share permission:-
System, VMM Service Account, Node1, Node2, HVCluster, Domain Admin, Administrator
Modify the NTFS Permission:-
System, VMM Service Account, Node1, Node2, HVCluster, Domain Admin, Administrator

You notice on default VMM Library share, you're not require to add each stand alone Hyper V host. But for cluster Hyper V host, you need to add them. Once you have configure the delegation for each nodes and cluster name, you've complete the process.
Now, when you tick share ISO for cluster node, you will be able to do so without any error.

Friday, April 2, 2010

Part 3:- Building VDI using Remote Desktop Services (RDS)

Here is the Part 3 of Building VDI using Remote Desktop Services (RDS). For those who has missed Part 2, please click on this link :- http://www.ms4u.info/2010/03/part-2-building-vdi-using-remote.html

Continue from Part 2. This part will focus on Guest VM configuration.

After the virtual machines are installed and configured for the ms4u.info domain, you must configure them to work with Remote Desktop Services. The following steps must be configured on each virtual machine:

• Enable Remote Desktop.
• Add the user accounts that will be using this virtual machine to the local Remote Desktop Users security group.
• Allow Remote RPC.
• Create a firewall exception to allow Remote Services Management.
• Add permissions to the RDP protocol.

Task 1: Enable Remote Desktop and Add VDIGroup to the local Remote Desktop Users group

1. Log on to VDI01-Win7 with administrative rights.
2. Click Start, right-click Computer, and then click Properties.
3. Click Remote settings.
4. Under Remote Desktop, click Allow connections only from computers using Remote Desktop with Network Level Authentication (more secure), and then click Apply
5. Click on select Users button
6. On the Remote Desktop Users, click Add
7. Enter VDIGroup and click Check name
8. Click OK button to close the Remote Desktop Users
9. Click OK button to close the System Properties
10. Repeat these steps for VDI02-Win7 and VDI03-Win7.

Task 2:- To allow Remote RPC for Remote Desktop Services

1. Log on to VDI01-Win7 with administrative right
2 Click Start, and in the Search programs and files box, type regedit.exe and then press ENTER.
3. Navigate to HKEY_LOCAL_MACHINE\SYSTEM\CurrentControlSet\Control\TerminalServer.
4. Double-click the AllowRemoteRPC registry entry, in the Value data box, type 1 and then click OK.
Default value is 0.
5. Close Registry Editor.
6. Repeat these steps for VD102-Win7 and VDI03-Win7.

Task 3- To enable the Remote Service Management Windows Firewall exception

1. Log on to VDI01-Win7 with administrative right
2. Click Start, click Control Panel, and then click System and Security.
3. Under the Windows Firewall heading, click Allow a program through Windows Firewall.
4. Select the Remote Service Management check box, and then click OK.
5. Repeat these steps for VDI02-Win7 and VDI03-Win7.

Task 4-To add RDP protocol permissions to a virtual machine

1. Log on to VDI01-Win7 with administrative right
2. Click Start, point to All Programs, and then click Accessories.
3. Right-click Command Prompt, and then click Run as administrator.
4. If the User Account Control dialog box appears, confirm that the action it displays is what you want, and then click Yes.
5. At the command prompt, type the following commands:

• wmic /node:localhost RDPERMISSIONS where TerminalName="RDP-Tcp" CALL AddAccount "ms4u\RDSVH$",1
• wmic /node:localhost RDACCOUNT where "(TerminalName='RDP-Tcp' or TerminalName='Console') and AccountName='ms4u\\RDSVH$'" CALL ModifyPermissions 0,1
• wmic /node:localhost RDACCOUNT where "(TerminalName='RDP-Tcp' or TerminalName='Console') and AccountName='ms4u\\RDSVH$'" CALL ModifyPermissions 2,1
• wmic /node:localhost RDACCOUNT where "(TerminalName='RDP-Tcp' or TerminalName='Console') and AccountName='ms4u\\RDSVH$'" CALL ModifyPermissions 9,1
• Net stop termservice
• Net start termservice

Note:-
Replace "ms4u" according to your domain name & "RDSVH" to your RD Virtualization Server host name.

6. Log off VDP1-CLNT. This is required in order for VDI Users to log on to one of the virtual machines in the virtual desktop pool successfully.
7. Repeat these steps for VDI02-Win7 and VDI03-Win7

Task 5- Enable Rollback on a virtual machine

Once you've complete all the configuration, you need to enable rollback. This allow VM to revert to original state once the user has log off. No data is saved into the VM. Please do not save your data inside the VM.
1. Open Hyper-V Manager. To open Hyper-V Manager, click Start, point to Administrative Tools, and then click Hyper-V Manager.
2. Under Virtual Machines, right-click VDI01-Win7.ms4u.info, and then click Snapshot.
3. Under Snapshots, right-click VDI01-Win7.ms4u.info, and then click Rename.
4. Type RDV_Rollback and then press ENTER. (Must use the exact snapshot name)
5.Cose Hyper-V Manager.
6. Repeat these steps for the VDI02-Win7 and VDI03-Win7 virtual machine

Task 6 - Verify Remote Desktop

1. Use your client computer and Open Re mote desktop connection. Click Start , on the search program and files , enter "mstsc" and press Enter
2. Key in "VDI01-Win7" and click Connect
3. Provide security authentication by enter username: -ms4u\vdiuser1 and the password is P@ssw0rd.
4. Click Ok
5. Make sure you can log on to the VM. Log off and repeat these steps for VDI02-Win7 and VDI03-Win7.

Stay tuned for Part 4:- Building VDI using Remote Desktop Services (RDS) - Click here

Thursday, April 1, 2010

SCCM Client Not Install and Approve

After the installation of SCCM and some minor configuration, you tend to go to Collection to check if SCCM client computer is discover or install. You will realised, it will display
Client - No
Approved - N/A
Site Code - CTS (Yes available)
Assigned - Yes


The client computer is online and you have waited for few hour. Here is the thing that you should start checking

1. Configure Site boundary. Refer to http://www.ms4u.info/2009/07/part-103-sccm-2007-sp1-post.html
2. Extend Active Directory Schema. Refer to http://www.ms4u.info/2009/07/part-101-system-center-configuration.html
3.Configure Client Push method. Refer to http://www.ms4u.info/2009/07/part-108-sccm-client-installation.html
4. Temporary disable Windows Firewall or Configure on Group Policy for Windows Firewall Exception. Refer to http://www.ms4u.info/2009/07/part-109-firewall-setting-for-sccm.html
5. Check CCMSetup.log from C:\Windows\System32\ccmsetup and check the log files. Go to end of the log and study the error. Sample of the log:-

If you see "Failed to successfully complete HTTP request", then you need to verify the Management Point role is working.
Go to Site Status and Check MP is installed and running. If MP is not install and failed, you need install configure WebDav setting. Please refer to http://technet.microsoft.com/en-us/library/cc431377.aspx

The settings were setup OK but for some reason they were not been recognized by the WebDAV component. What I did was open and edit the C:\Windows\System32\inetsrv\config\schema\WEBDAV_schema.xml file. The following parameters were changed:

element name="properties"
attribute name="allowAnonymousPropfind" type="bool" defaultValue="true"
attribute name="allowInfinitePropfindDepth" type="bool" defaultValue="true"
attribute name="allowCustomProperties" type="bool" defaultValue="false"

After that, I restarted the service SMS_SITE_COMPONENT_MANAGER and the log shows: "SMS Site Component Manager successfully installed this component on this site system.". The status should be OK and on the collection, you will see the status of
Client - Yes , follow by
Approved -Approved.
On client computer, please refer to http://www.ms4u.info/2009/07/part-110-verifying-sccm-client.html
 
For more troubleshooting about Management Point, please refer to http://technet.microsoft.com/en-us/library/bb932118.aspx