Search This Blog

Monday, November 30, 2009

Microsoft Virtualization MCITP on beta

Finally, MCITP:Virtualization Administrator exam is on beta stage. The exams MS Learning currently have on the development schedule:

•70-659: TS: Windows Server 2008 R2, Server Virtualization
•70-669: TS: Desktop Virtualization
•70-693: Pro: Windows Server 2008 R2, Virtualization Administrator

Passing all three exams will earn you the MCITP: Windows Server 2008 R2, Virtualization Administrator credential.

Beta exam 70-659 is expecting to start on Dec 1- Dec 31,2009.

For more information, please refer to http://borntolearn.mslearn.net/2009/11/virtualization-exam-updatewhats-in-the-box

Sunday, November 29, 2009

Quick Testing on Citrix Essential for Hyper V,Express Edition with Datacore Virtual SAN Appliance

As a follow up on my previous article:- http://www.ms4u.info/2009/11/walkthrough-on-citrix-essentials-for.html, i managed to find a Virtual SAN appliance which support Citrix Essential.

Here is the summary of the tasks that you need to configure in Citrix Essential for Hyper V:-
a) Install and configure the supported storage adapter.
b) Create storage repository
c) Create storage profile
d) Create Virtual machine template
e) Create Virtual Machine

Let look into more detail on each tasks.

As starting, you need to download and install DataCore™ Adapter for Citrix® StorageLink™ Technology.
Go to http://www.datacore.com/ftp/downloads/CitrixStorageLinkAdapter.zip and install the Adapter.

Then you need to download Virtual SANMelody from http://www.datacore.com/virtualSANappliance/#1  . Extract the VHD and Import the Virtual Machine to Hyper V Manager. Launch the SanMelody Virtual Machine and check the ip address assigned by your dhcp server. It is recommended to set a static ip address. For this case, i have set to ip address 192.168.1.1

1. Open the Citrix StorageLink Manager snap in and proceed to Storage Infrastructure pane. Add a new storage adapter. Enter the SanMelody Virtual SAN appliance details. For the authentication, the default password for SanMelody is "Evaluation1".


After added the storage adapter, you can see the adapter is listed in the Storage System.


2. Create Storage Repository

Go to Storage Repository pane and click on Create Storage Repository.


Enter the Storage name and select Sanmelody as your storage system.


Select the storage pool that you have configure in the SanMelody virtual image


Uncheck import pre-provised storage volume and Click Finish button.


Once complete, import storage Volume 1,2 and 3 into VMDisk storage.


3. Next, create a storage profile.
Go to Virtual Machine Template pane, click on Create storage profile.


Specify a storage profile name, select Storage repository that you have created in step 2, select a boot storage volume: Vol 1.Add Vol 2 and Vol 3 into selected storage volume.


4. Create a Virtual Machine Template.

Go to Virtual machine template and select "create a Virtual Machine Template"


Example: Enter web server template which use VMDisk Storage profile that you've created in step 2 and select the Server Profile (low-load) as the hardware profile. This option is similar as hardware profile in SCVMM.


5. Finally, you can start to create a Virtual machine. Still on Virtual Machine template, specify "Create a Virtual machine."


Select the template that you have created in Step 4.


Enter the virtual machine information and specify four (4) Web server VM that you want to create.


Review the configuration before click Finish. Once you click Finish, you can go to Job pane and check the VM creation status.


On Hyper V Manager or Virtual Machine pane, you will see four (4) Web server VM has created.


Just follow the same step as listed above if you have the supported storage system.

Enjoy !

Friday, November 27, 2009

Glance through on Citrix Essentials for Hyper-V, Express Edition

I have come across to Citrix website while browsing. Citrix has recently offered a free Express Editon-Citrix Essential for Hyper V The product helps Hyper-V administrators take full advantage of powerful storage-based features like deduplication, thin provisioning, cloning, snapshots and replication.

Citrix StorageLink is part of the Citrix Essentials product offering. Citrix StorageLink is an enterprise‐class virtualization storage resource management service for Microsoft Hyper‐V and Citrix XenServer deployments. StorageLink accelerates application delivery by automating complex virtual machine storage resource management operations, allowing you to leverage advanced storage services to rapidly bring new virtual machines online, simplify storage management, improve storage utilization and lower TCO. You create virtual machines from pre‐defined virtual machine templates that identify the hardware and storage resources required by the virtual machines.

For more information about Citrix Essential for Hyper V, Express Edition, please go to
http://www.citrix.com/English/ps2/products/subfeature.asp?contentID=1855667

To download, please go to:- http://www.citrix.com/ehvexpress . Once download, you can install Citrix StorageLink Gateway and StorageLink Manager on a Windows Server 2003/2008 with Powershell and MMC 3.0 installed.

Citrix Essentials for Hyper‐V Express Edition entitles the customers to use StorageLink for up to two Hyper‐V servers and a single storage array, without the requirement of a license or installation of the Citrix License server. You can only use Citrix Essential when you have the following supported storage:-


Here is some quick guide on what to do after finish the installation

a) Connect to your Hypervisor hosts by clicking on Add Hypervisor host.
b) Add Storage Array Adaptor
c) Create a Storage Repository

Since i did not have the supported storage, let glance through on the Citrix StorageLink Manager. The interface almost similar as SCVMM, so you would not have any problem when using Citrix StorageLink manager .

1. To add hypervisor host, click Add hypervisor host.


The Express edition, did not allow you to manage Cluster Hyper V host. In order to manage, cluster Hyper V host, you need to purchase full edition. Below is the snapshot of error message that i get when trying to add Cluster Hyper V host.


2. After adding a hypervisor host, you can see the Host and Virtual machine.

a) Hypervisor host pane


b) Virtual machine pane

c) Storage Infrastructure pane

d) Virtual Machine template pane.
Function is identical as Library feature in SCVMM product,

e) Jobs pane.
Function is identical as SCVMM product.


f) Administration pane.

If you have the supported storage, you can give a try for this product.

Enjoy !

Saturday, November 21, 2009

Configure DPM to backup Sharepoint/MOSS 2007

The configuration is not as direct as configure protection group for SQL database. If you start by creating protection group for sharepoint without configure additional setting, you will not able to see the sharepoint farm. You may start to wonder "How can i backup sharepoint by using DPM? Let look into how to configure protection group for sharepoint/MOSS 2007.

Pre-requisite:-
a) Install DPM agent into all the sharepoint and database server.
b) Download and install Service Pack 2 for Windows SharePoint Services 3.0, x86 & x64
http://www.microsoft.com/downloads/details.aspx?FamilyId=79BADA82-C13F-44C1-BDC1-D0447337051B&displaylang=en

c) Download and install Service Pack 2 for Office SharePoint Server 2007, x86 & x64
http://www.microsoft.com/downloads/details.aspx?FamilyId=B7816D90-5FC6-4347-89B0-A80DEB27A082&displaylang=en

After applying the preceding updates, run the SharePoint Products and Technologies Configuration Wizard.This needs to be done on every server in the farm with SharePoint installed. The version of content databases should be 12.0.0.6421 after successfully applying these updates.

If you did not patch the sharepoint server, you will see the below error message when try to select the sharepoint farm.


Make sure the DPM agent is deployed to each server requiring protection (including MOSS Recovery Server). We need to let DPM know that there is a SharePoint farm requiring protection and give it permissions to access that farm. Note: The account used should be farm administrator and local administrator on the WFE.

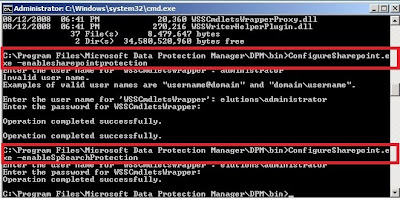
To do this there is a utility available called ConfigureSharePoint.exe. The utility can be found in the \bin folder of the WFE that you have deployed the protection agent to. This utility configures the WSS Writer service and any associated services with the correct credentials required to access the farm for backup and recovery purposes. It also allows you to configure other options such as protection for search and the temp folder location.

Execute:-

a. DPM Installation Path\bin\ConfigureSharePoint.exe” –EnableSharePointProtection

b. DPM Installation Path\bin\ConfigureSharePoint.exe” –EnableSPSearchProtection


Once you have execute the above command on the sharepoint server, proceed to DPM server to configure the protection group. The step is similar as this article:- http://www.ms4u.info/2009/10/backup-hyper-v-vm-using-dpm-2010-beta.html . Instead of seeing Hyper V, you can see the sharepoint farm.


After create the protection group for sharepoint, the end result will look like this:-


Before i conclude, you may wonder "Do i need to create a protection group for Sharepoint database?"
The answer is "No!" . But you can use DPM to protect the SQL Server. When you try to create a protection group for sharepoint database, you will notice that DPM has automatically configure backup for the SQL database and there is no "tick" box to select the sharepoint database.

Please refer to below figure for more information.


You only can protect master, model and msdb database.

Hope this information is informative and assist you. That's all for the step by step instruction to configuring protection group for Sharepoint/MOSS.

Thursday, November 19, 2009

This Windows SharePoint Services Farm cannot be protected because DPM did not find any dependent databases and search indices to be protected. (ID: 32008)

When you're adding sharepoint in protection group for DPM 2007 SP1, you will see Error ID: 32008 and 32009.
"This Windows SharePoint Services Farm cannot be protected because DPM did not find any dependent databases and search indices to be protected. (ID: 32008)"


Error 1:-


Error 2:-


Error 3:-


Resolution:-
One of the common problem is because previously you have added sharepoint database (SQL) into the DPM protection group. You need to need to remove the MOSS database from the protection group. When you're adding sharepoint into the protection group, by the default DPM will use sharepoint writer to protect the database as well. So it advisable not to set sharepoint database into protection group.

Monday, November 16, 2009

Item level recovery (ILR) from Virtual machine using DPM 2010 Beta

Besides than support backup for Hyper V R2, DPM 2010 Beta included an item level recovery from host based virtual machine.You can go inside the virtual machine and recovery files to a network shares or a volume on the DPM protected server without restoring the whole VM.
To support ILR, you must have the Hyper-V role enabled on the DPM server. During item-level recovery, DPM has to mount the VHDs of the protected virtual machines.

Follow the following step by step to perform item level recovery:-

1.In DPM Console, click on Recovery tab and select Hyper V Protected Data


2. Double click on the VM and Virtual machine Volume on the recoverable items list.


3.Select the item (files and folders) you want to recover. You can select and recover multiple files/folders from the list. Right Click the files and select Recover to start the Recovery Wizard.


4. A recovery wizard appear. Click Next to start the item level recovery.


5. On the Recovery Type. Select Copy to a network folder.

6. On the Destination, click Browse and select the location that you want to recover the file to put.

7. You can recover to a network shares or a volume on the DPM protected server

8.Leave as default for recovery option

9. Review the summary before click Recover button.

10. The DPM will recover your data to the location that you've previous specified.


Cool right ! Now you can recover a files inside the host virtual machine without installing an agent into the guest Virtual Machine.

Sunday, November 15, 2009

Virtual Machine Conversion Best Practices

You need to understand source and target server requirement for successful conversion.

Here is some guideline when performing P2V (Physical to Virtual) conversion:-
Source server
a) Minimum of 512 MB of memory
b) Same domain as the VMM 2008 R2 server or join to domain with a two way trust domain.
c) Online P2V conversion supported for those operating system with VSS (Volume Shadow Copies). Windows Server 2000 will use Offline P2V conversion technique.

Target server limitation
a) Maximum of 32 or 64GB of memory (based on windows edition)
b) Maximum of 4 processor cores.
c) Maximum of 12 network interfaces
d) Maximum of 2TB disk for any VHD
e) Maximum 256TB for pass through disk
f) Maximum total storage of 517TB using VHD
g) Maximum total storage of 66560TB using pass through disk

Best practices before conversion:-
a) Run chkdsk utility to make sure no bad sector on the hard disk
b) Run defragmentation utility
c) Use 1Gbps to reduce the time to complete a conversion
d) Perform conversion on those server which is low utilization first before convert medium and high utilization server.
e) Temporarily disable Windows Firewall on the source server

Saturday, November 14, 2009

Rapid Provisioning Virtual Machine with Templates

I saw a lot of people still asking about how to properly configure rapid provision virtual machine in the forum. Let go through the proper step by step instruction on how to achieve rapid provision virtual machine using template.

1. You need to install an operating system and generalize it by using the command "SYSPREP"
Use the command prompt and proceed to folder c:\windows\system32\sysprep. Run sysprep /generalize /shutdown command.
This command will generalize the operating system by removing the SID and shutdown once complete.

2. Copy the VHD to the Library server.

3. Create new configuration and use existing disk. Go to Library pane and select New template which located in the Action pane (right side)


4. New template wizard appear. Select browse on "Use an existing template or virtual disk hard disk stored in the library". Select the VHD that you have created in step 1 and 2.


5.Enter the name of the template name identity.


6. On the configure hardware, customize your hardware profile. (You can select your existing hardware profile if you've created previously)


7. On the guest profile, enter the correct password, product key, time zone and operating system type.
Make sure that you're entering a complex password if you're using Windows Server 2008. (You can select your existing guest operating system profile if you've created previously)


8.Review the summary before click Create button.


You've just create a template for rapid provision virtual machine.With this template, you can use it when create new virtual machine either using VMM console or Self Service Portal.

Wednesday, November 11, 2009

Microsoft Assessment and Planning Toolkit 5.0 CTP released

The Microsoft Assessment and Planning Toolkit 5.0 CTP is an agentless tool designed to simplify and streamline the IT infrastructure planning process across multiple scenarios through network-wide automated discovery and assessments. This tool makes it easier for Microsoft customers and partners to quickly identify critical assets in their IT environment. It performs key functions including hardware and software inventory, hardware compatibility analysis, virtualization readiness planning, and generation of actionable, environment-specific IT proposals for infrastructure planning.


What’s New with v5.0 CTP?

Version 5.0 CTP of this toolkit has the following new features:
• Heterogeneous Server Environment Inventory for Technologies including Windows Server, Linux, UNIX and Vmware.
• Ability to determine usage of deployed System Center Configuration Manager, a member of the Core Client Access License Suite.
• Office 2010 Readiness Assessment.
Additional Features
• Windows 7 Hardware and Device Compatibility Assessment.
• Windows Server 2008 R2 Hardware and Device Compatibility Assessment.
• Virtualization Candidates Assessment for Hyper-V Server Consolidation.
• Inventory of VMware Server Hosts and Guests.
• User Interface and Proposal Customization for Partner co-branding.
• Enhanced Usability and Improved Inventory Performance.
• SQL Server Instance Discovery.
• Desktop Security Assessment for Anti-virus and Anti-malware Programs Installation.
• Forefront Client Security/NAP Readiness Assessment.

Register for the MAP Toolkit 5.0 CTP and download at: https://connect.microsoft.com/Downloads/DownloadDetails.aspx?DownloadID=23188&SiteID=297

Monday, November 9, 2009

DPM 2010 Beta Failed to install in Windows Server 2008 R2. Error ID 812

When you install DPM 2010 Beta in Windows Server 2008 R2, you will receive an error id 812.

Error snapshot:-


Workaround:-
1. Edit C:\Program Files\Microsoft DPM\SQL\MSRS10.MSDPMV3BETA1EVAL\Reporting
Services\ReportServer\rsreportserver.config
2. Set the SecureConnectionLevel to 0 if the current value is 2 (A value to 2 means secure connection is required)


3. Go to Services snap-in and restart all SQL Services.
4. Start the DPM 2010 beta installation again. That should do the trick and your DPM 2010 installation will successful.