Just got it from my friend which i would like to share to all of you....
Check out the Remote Server Administration Tools for Windows 7. It’s the final release to the Web!
The final release of the Remote Server Administration Tools for Windows 7 went live to the web – and is available to customers in all the Server 2008 R2 languages.
Where to Install
The main download page is here: http://www.microsoft.com/downloads/details.aspx?FamilyID=7d2f6ad7-656b-4313-a005-4e344e43997d&displaylang=en
Note: RSAT Client is available to all customers as part of the supplemental Microsoft Software License Terms to Windows 7 licenses.
What is included in RSAT?
This is the list of Windows Server administration tools which are included in the final RTW of RSAT Client for Windows 7:
Server Administration Tools:
Server Manager
Role Administration Tools:
Active Directory Certificate Services (AD CS) Tools
Active Directory Domain Services (AD DS) Tools
Active Directory Lightweight Directory Services (AD LDS) Tools
DHCP Server Tools
DNS Server Tools
File Services Tools
Hyper-V Tools
Terminal Services Tools
Feature Administration Tools:
BitLocker Password Recovery Viewer
Failover Clustering Tools
Group Policy Management Tools
Network Load Balancing Tools
SMTP Server Tools
Storage Explorer Tools
Storage Manager for SANs Tools
Windows System Resource Manager Tools
Enjoy!

Showing posts with label Windows 7. Show all posts
Showing posts with label Windows 7. Show all posts
Wednesday, August 12, 2009
Tuesday, August 11, 2009
Bitlocker To Go
Windows 7 included with a new features called Bitlocker To Go. Sound great right! and you will think: I need TPM ! Good news is you do not need to have TPM. Just a USB thumb drive and you can enable Bit Locker To Go in Windows 7.
Basically, BitLocker To Go allows you to encrypt a USB drive and restrict access with a password. Without the password, the USB drive is worthless.
Let try setting up this feature.
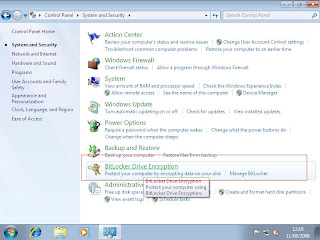
1. First, Insert Your USB thumb drive. Go to Control Panel, select System and Security and Click on BitLocker Drive Encryption.
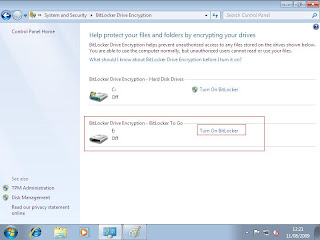
2. You will see your USB thumb drive in Drive E. Click Turn on Bit Locker
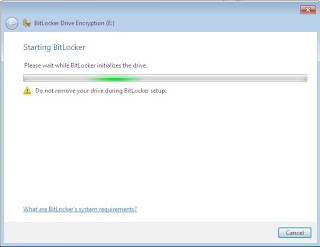
3. The system will initialize the drive.
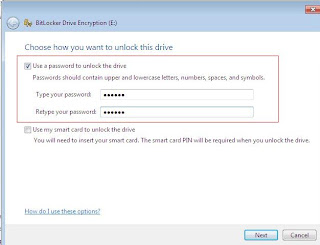
4. Tick Use a password to unlock the drive
5. Select your option for store your recovery key. I choose Save the recovery key to a file.
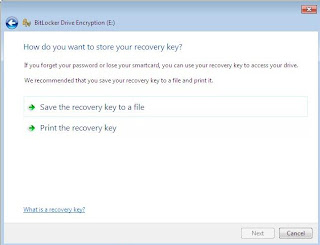
Here is sample of the recovery key:-
------------------------------------
BitLocker Drive Encryption Recovery Key
The recovery key is used to recover the data on a BitLocker protected drive.
To verify that this is the correct recovery key compare the identification with what is presented on the recovery screen.
Recovery key identification: 57FB0FAC-3F65-46
Full recovery key identification: 57FB0FAC-3F65-4613-A701-158EC903829D
BitLocker Recovery Key:
403590-689084-000220-566885-365244-225269-631961-645436
------------------------------
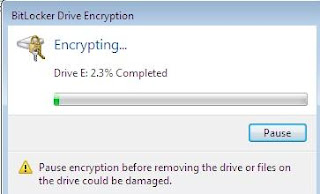
6. Click Start Encrypting to begin encrypt the USB thumb drive. During the encryption process, Windows 7 installs a special reader on the USB drive.

7. Warning :- Do not remove the drive without click Pause as this may damage your USB thumb drive.
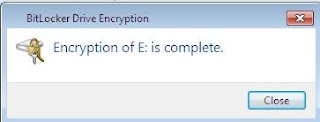
8. Wait until you see this screen:-
Let try open in another machine...
1. When you connect the USB drive to a computer running XP or Vista, the BitLocker To Go Reader takes control, prompts for the password, and then basically makes the USB drive a read-only device.

2. After enter the correct password, BitLocker To Go Reader is open and you can see all your files. You only can drag and drop files to your computer.

Note:- When you connect the USB drive to a Windows 7 computer, you are prompted for the password and upon entering it you can read and write to the drive as you normally would.
So just keep in mind, if you want to transfer files to USB thumb drive in XP and Vista, don't use Bitlocker To Go..
Basically, BitLocker To Go allows you to encrypt a USB drive and restrict access with a password. Without the password, the USB drive is worthless.
Let try setting up this feature.
1. First, Insert Your USB thumb drive. Go to Control Panel, select System and Security and Click on BitLocker Drive Encryption.

2. You will see your USB thumb drive in Drive E. Click Turn on Bit Locker

3. The system will initialize the drive.

4. Tick Use a password to unlock the drive

5. Select your option for store your recovery key. I choose Save the recovery key to a file.

Here is sample of the recovery key:-
------------------------------------
BitLocker Drive Encryption Recovery Key
The recovery key is used to recover the data on a BitLocker protected drive.
To verify that this is the correct recovery key compare the identification with what is presented on the recovery screen.
Recovery key identification: 57FB0FAC-3F65-46
Full recovery key identification: 57FB0FAC-3F65-4613-A701-158EC903829D
BitLocker Recovery Key:
403590-689084-000220-566885-365244-225269-631961-645436
------------------------------
6. Click Start Encrypting to begin encrypt the USB thumb drive. During the encryption process, Windows 7 installs a special reader on the USB drive.

7. Warning :- Do not remove the drive without click Pause as this may damage your USB thumb drive.

8. Wait until you see this screen:-

Let try open in another machine...
1. When you connect the USB drive to a computer running XP or Vista, the BitLocker To Go Reader takes control, prompts for the password, and then basically makes the USB drive a read-only device.

2. After enter the correct password, BitLocker To Go Reader is open and you can see all your files. You only can drag and drop files to your computer.

Note:- When you connect the USB drive to a Windows 7 computer, you are prompted for the password and upon entering it you can read and write to the drive as you normally would.
So just keep in mind, if you want to transfer files to USB thumb drive in XP and Vista, don't use Bitlocker To Go..
Installing Windows 7 RTM
Windows 7 RTM is available on 7 August 2009 and you can login to Technet website (http://technet.microsoft.com/) in order to download the iso file.
Well, i have downloaded Windows 7 Enterprise Edition RTM and let see what is the different during the installation.
1. Let start by booting your computer with the Windows 7 DVD inside.
Select your language, time and currency and keyboard method according to your country.

2. Select Install Now

3.Tick and accept the license terms.

4. Select custom type of installation.

5. You will see your hard disk space. Click on Drive option to create a partition.

6. Select New and enter your partition size.

7. The system will prompt and ask to create 100MB of system boot partition. The concept is almost similar as creating /root partition in linux. By allocate this system reserve, your system run a bit faster. (i think ...:)..)

8. It will look like this after creating the partition.

9. Click Next and start the installation.
10. After the system finish installing the operating system, it will prompt to enter username and computer name.

11. Enter the password

12. On the protection, select Use recommended setting for software update.

13.Select the correct time and date

14. On the computer location, select based on your current location.

15. Installation is complete and this is the screen when first login.

Quite straight forward right...The installation is almost similar as Windows Vista and Windows Server 2008. The different is allocate Boot partition.
Subscribe to:
Posts (Atom)