Here is a tips which i would like to share when i tried to deploy FCS client in a workgroup environment.
a) Copy the Client folder which contain FCS 32x and 64x installation files from the CD into the target computer.
b) Use command prompt, type the command "clientsecurity.exe /nomom"
Note:- If you just execute Step A and B, you will not be able to update the FCS client.
c) Go to FCS server and create .reg file called Nonworkgroup.reg using the FCS console and deploy it.
d) Copy the Nonworkgroup.reg file that you have created in step C into Client folder (step A).
e) Use the command prompt, type the command "fcslocalpolicytool.exe /i Nonworkgroup.reg" to merge the reg file into the computer.
f) Try update the FCS client. It should be working right now.

Showing posts with label Forefront. Show all posts
Showing posts with label Forefront. Show all posts
Sunday, September 13, 2009
Friday, September 11, 2009
WUA API 2.0 is installed but the version of wuapi.dll is earlier than 5.8.0.2469
When you want to install Forefront Client Security, you will receive this error message
"WUA API 2.0 is installed but the version of wuapi.dll is earlier than 5.8.0.2469"
This is due to older Windows Update agent version installed on your server. Proceed to http://technet.microsoft.com/en-us/library/bb932139.aspx to get the latest Windows Update agent.
Once you've install the latest version, you can proceed with FCS installation.
Monday, August 10, 2009
Part 3:- Integrate Forefront TMG into an array
In this article, i'm assume that you have perform Part 1 and Part 2 - Installing Microsoft Forefront TMG in another server.
By using a new installed stand alone TMG server, we are going to join to an array.
1. Using Forefront TMG Management console, click join Array on the Roles configuration.

2. Welcome screen to the Forefront TMG Join Array Wizard is open.

3. On the Array Membership Type, select Join an array managed by an EMS server.

4. Enter the EMS FQDN as you've created in previous article and select connect using the credential of the logged user.

5. The wizard will detect your EMS and show the Lab-Array which you've created in previous article. Select join an existing EMS managed array- Lab-Array.

6. Review the wizard and click Finish

7. It will join your existing stand alone server into EMS array

8. Just wait until you see this screen

9. On the Array, Click Dashboard. The Dashboard is the place whereby you can monitor TMG alert, session on each joined TMG in an array, Protection , Definition updates, Network Status and Services status of TMG.

That's concluded the lesson about integrating Forefront TMG into an array. Stay Tuned for overview features of TMG in the upcoming article
Friday, August 7, 2009
Part 2 - Integrate Forefront TMG into an array
We will continue from previous Part 1. Make sure you have read and follow Part 1- Integrate Forefront TMG into an array before continue this guide.
1. Start by open the Forefront TMG management from Start > Programs > Microsoft Forefront TMG > Forefront TMG Management

2. This is screen after installed EMS. Click on Array and Click Create New Array on the right pane.

3. New Array Wizard is open. Enter the array name before click Next. In my lab, i will called it "Lab-Array"

4. On the Array DNS name, enter a FQDN for your array.eg:Lab-Array.pcs.com.my

5.Then select Default Policy to assign Enterprise policy to your array. Default Policy contain "Deny All" rule.

6.Then you must specify array policy rule types which you can create in the array. By default: select all rules (Deny, Allow, Publishing)

7. Review first before click Finish to start create the array

8. After you click Finish, the wizard will start to create an array

9. This is screen layout after finish create an array

Part 1- Integrate Forefront TMG into an array
This guide is using Microsoft Forefront TMG Enterprise Edition Beta 3.
The Enterprise Management Server (EMS) is a server which is used to manage a TMG Enterprise Array or stand alone server. EMS must install on a separate machine and do not contain any TMG installation.
Before you start to install Enterprise Management Server, your server must join to domain. If not, you need to provide server certificate for workgroup environment during EMS installation. Let explore further..
1. Double click the installation file and select Install Forefront TMG.
It will start to check and install preparation tools as discussed in Installing Microsoft Forefront TMG - Part 1. Then when you reach to installation type page, you must select Install Enterprise Management Server.

2. The installation wizard screen is apprear.Click Next

3.Accept the license agreement

4.Enter customer information such as username, organization and product key

5.Specify the installation path

6.Select create a new enterprise configuration on this EMS
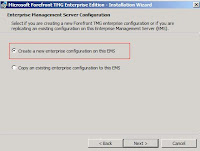
7. Review the new enterprise warning and Click Next.

8. On Create New Enterprise, specify the enterprise name

9. Then on Enterprise Deployment Environment, specify single domain deployment. All TMG server computer is located in the same domain

10.Click Next to start the installation

11.Click Finish to end the installation wizard

In the upcoming article, i will continue to discuss about create an array in the TMG.
Stay Tune...
Thursday, August 6, 2009
Part 103:- Installing Microsoft Forefront TMG - Step 3
Go to Start > Program > Microsoft Forefront TMG > Click Microsoft Forefront TMG Management to start the TMG console.
1. When you click TMG management snap-in for the first time after the installation, a Getting Started Wizard is open. Click Configure network setting to define network setting for Forefront TMG.

2. Network Setup wizard will appear. Click Next

3. On the Network Template selection, specify the network template that best fits in your topology. Since i only got 1 network adapter, i will specify Single Network adapter network template.

4.Verify the Local Area Connection TCP/IP setting

5. Click Finish to complete the Network Setup Wizard.

Next, select Configure system settings to define local system setting for TMG.

6. System Configuration welcome wizard is appear. Click Next

7. Enter host detail such as computer name, workgroup/domain and primary dns suffix.

8.Click Finish to complete the System Configuration Wizard.

Lastly, on the Getting started wizard click Define deployment options.

9. Deployment Wizard welcome page is open.

10. Specify use Microsoft Update to get the definition update

11. Select Activate and enable Network Inspection Service.
12. Selecy Activate and Enable Web Protection. You can evaluate for a year in Beta 3.
Tick Enable Malware protection
Tick Enable URL Protection

13. Leave the default setting for NIS Signature Update setting

14. On the Customer feedback, select No. I do not want to participate.

15. On Microsoft Telemetry service, select No

16. Click Finish to end the Deployment wizard.

You have completed the Getting Started Wizard configuration.

After you click Close, the system will run Web Access Policy Wizard.

17. Click Yes, create a ruke blocking the minimum recommended URL categories.

18. On the Web Blocked Destination, click Next

19. On the Malware Inspection Setting, select option Yes, inspect Web Content requested from the Internet and check the Block encryped archives.

20. On the HTTPS Inspection Settings, select Allow users to establish HTTPS connections to web sites and do not inspect HTTPS traffic but validate HTTPS site certificate.

21. Tick Enable Web caching and define cache drive

22.Click Finish to complete the Web Access Policy Wizard

Now you've finish the configuration for the basis setting in TMG.
Subscribe to:
Posts (Atom)