Search This Blog

Monday, December 30, 2019

Building Home Lab VPN

In this post, we are going to setup Home Lab VPN using VeeamPN. Once setup, you able to access your lab from outside.

Download from here. Current latest version is:- Version: 2.1.0.461
Export OVA to Vmware infrastructure

Default login:
username: root
password: VeeamPN


After login in, get the ip address using command "ifconfig"


Use browser to login to VeeamPN webpage for further configuration

https://veeampn ip address

Change your password when login 1st time/

Then walkthrough on initial configuration

  • installation type (Network hub, site gateway, restore config backup)
  • generate self signed certificate
  • specify VPN settings 
You may view further configuration from here

For macbook user, follow this site to learn how to connect.

Enjoy!


Friday, December 27, 2019

How to Backup Azure SQL Database to Local - Part 4

Continue from Part 3, we are going to explore on way to backup Azure SQL Database. In this post, we are putting backup data into Azure Blob Storage.

Natively Azure SQL Database allow to export database into Azure Blob Storage.

To do so, on database click Export


Provide

  • File name
  • Subscription Plan
  • Storage to store backup data
  • Database credential


It will take a while for the process to run. You can view status from Import/Export History.

 After backup completed, you can view the bacpac file in your Azure Blob Storage.

That's all for today.

To view previous part, please click below link:


Sunday, December 15, 2019

How to Backup Azure SQL Database to Local - Part 3

Continue from Part 2, we are going to explore next tool to backup Azure SQL Database to Local Computer.

Tool 3: SqlBackupAndFTP Tool

Able to download this tool from here. It is provided free to backup 2 database.

It support MS Sql, My SQL and PostgreSQL database. This tool allow you to backup SQL database to Bacpac file with scheduling for full, differential & transaction.


You can use wizard to configure the backup. Start by selecting type of database.


Next step, enter Azure SQL Server name & credential


Once connected, select database that you want to backup.


Then select your backup target location. For our scenario, we select "Local"


Specify the schedule that you want to backup. You can click on Settings to change the schedule to advance mode.


Finally to get the result, we can send notification via email.


[Result] 
Backup will run according to schedule. You can view the status from log.


That's all for today.

Click here for Part 4.

Wednesday, December 11, 2019

How to Backup Azure SQL Database to Local - Part 2

Continue from Part 1, we are going to explore next tool to backup Azure SQL Database to local.

Tool 2:- Use SQLPackage Utility. This tool will create BACPAC file from a command line. You can run unattended/automatically using batch file & scheduler.


[Pre-requisite]
Download SQLPackage from here
or 
Download Visual Studio Community. Install Data Storage & Processing
Install Analysis Services & Reporting Services, Integration Services component in Visual Studio Market Place. Click here

[Begin]

Query the location of SQLPackage by typing command "dir sqlpackage.exe /s /p"


[ Backup ]

Execute command 

Command:
sqlpackage.exe /Action:Export /ssn:tcp:<location> /sdn:<dbname> /su:<username> /tf:c:\backup\<dbname>.bacpac /sp:<password> /p:Storage=File


Example:
sqlpackage.exe /Action:Export /ssn:tcp:testdb1.database.windows.net /sdn:testdb1 /su:ericlaiys2019 /tf:c:\backup\testsqlpackage.bacpac /sp:1234567890@ms4u /p:Storage=File


Click here for Part 3.


Monday, December 9, 2019

How to Backup Azure SQL Database to Local - Part 1

In this post, we are looking into a way to backup Azure SQL Database which resides on PaaS to local or back to customer on-prem.

This is Part 1 of the tools.

[Pre-requisite preparation]


  • Create any Windows VM operating system. We used Win 10.
  • Install SQL Server Management Studio (SSMS). It require the latest DAC library installed.To download, click here
  • Add Service endpoint on virtual network. Go to Virtual Network > Add Service Endpoint > Microsoft.SQL

  • On SQL Database, open Azure SQL Database Firewall to allow access to the VM


Tool 1: Export a Data Tier Application Using SSMS


  • Open SSMS Tools and Connect to your Azure SQL Database
  • Right click select your database > Tasks > Export Data Tier Application


It will create BACPAC file which will create an exact copy of the database.

This process is manual procedure.

Review Part 2 here.

Sunday, October 20, 2019

Setup Oracle Solaris 11.4 for Lab Use

In this post, we are going to install Oracle Solaris 11.4 VM using Vmware workstation.

[Download]
1. OS - https://www.oracle.com/solaris/solaris11/downloads/solaris-downloads.html

Select "Installation from CD/DVD"


Select "x86 Text Installer" to download the iso


2. Oracle Solaris Zone Template - https://www.oracle.com/solaris/solaris11/downloads/solaris11-vmtemplates-zones-downloads.html

Select "Download x86 - Oracle VM template for Oracle Solaris 10 Zone

[Installation OS]
Create a VM with the spec

  • 4 vcpu
  • 8GB RAM
  • 30 GB HDD

Follow step to configure the installation:- http://www.ms4u.info/2018/06/install-oracle-solaris-113.html

After installation, transfer the VM Template using WinSCP Tool

[Installation Oracle Vm template]

1. Rename the file without .bin and make the download file executable

mv solaris-10u11-x86.bin solaris-10u11-x86
chmod +x solaris-10u11-x86

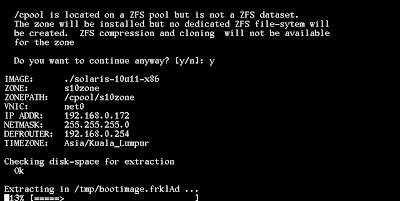
2. create a folder /cpool using mkdir comamnd
3. start installation with the following command

./solaris-10u11-x86 -p /cpool -a 192.168.0.172/24 -i net0 -f -z s10zone

Note: IP address refer to your own Oracle Solaris IP


If encounter not enough free swapfile, you can increase using "swap" command


Guide:-
https://docs.oracle.com/cd/E23824_01/html/821-1459/gizfl.html


Installation started.....

Enjoy!


Saturday, October 19, 2019

Failed to Retrieve License When Backup Using Veeam Backup for O365

Received an error message "Failed to Retrieve License" when want to protect O365 using Veeam Backup for Office365.


There are few things to check:
1. Make sure O365 users has license to the product. (Example: exchange mailbox, sharepoint sites)
2. Sufficient license on VB 0365 license.
3. Account connect to 0365 organization should have the following permission listed here:- https://helpcenter.veeam.com/docs/vbo365/guide/vbo_required_permissions.html?ver=30
4. If (1), (2) and (3) is valid, but still receive above error message, then check your deployment.
Install VB 0365 on dedicated VM without sharing with other Veeam product.

Hope this help.

Sunday, October 6, 2019

Perform Backup Verification Using Veeam Data Labs

In this post, we are going to test our backup data in an isolated environment while production VMs are up and running. The best part is without restore backup data and without prepare a staging environment.

How are we going to do it? Quite simple with Veeam Data Labs. With Data Labs we can mount backup data from Veeam repository to an isolated environment. VM able to power up from backup storage & perform backup verification.

Let explore on how to do it with our environment.


[Our environment]
  • Subnet: 192.168.0.0/24
  • Gateway : 192.168.0.254
  • Backup Virtual Machine using Veeam Backup & Replication & store into Veeam Repository
  • [optional] - Supported storage integration & use Storage snapshot
  • Vmware ESX Host

[ Virtual Lab ]

The first step is create a virtual lab. Virtual Lab is an isolated virtual environment in which Veeam Backup & replication verifies VMs.


Isolated environment:
  • Masquerade Subnet: 192.168.255.0/24 [non routable IP address]
  • Proxy Appliance IP: 192.168.0.111 [Same range as production network]

  • Proxy Appliance IP in the isolated network: 192.168.0.254 [match the production gateway ip]
  • Networking : Advanced single host[manual configuration]


  • Static IP Mapping: Only Veeam Backup Server has access to isolated environment. If you want to access from production network, you can define static IP address mapping [routable ip on production network]
    • 192.168.0.49 [Isolated IP]  -> 192.168.0.149 [DC Production IP]


[Application Group ]

Define priority of VM start in an isolated environment by using Application Group.


Select where the source that you want to take for backup verification. You can select from backup, replica or from storage snapshot. We will select "From backup"


Our workload: Active Directory & Exchange VM

Set priority VM to boot. AD need to boot first before exchange server. Put AD to top of the list.


Edit the VM, define the test to perform.

Example:
AD - Test DNS, Global Catalog
Exchange - Test Mail


[SureBackup]

Once you've created virtual lab & application group, you can start to create a SureBackup Job to verify backup data in an isolated environment.


Select Virtual Lab that you've configured in previous step


Select Application Group that you've configured in previous step


[Final result]


Infrastructure Report Using Veeam One

In this post, we are going to look on how to get infrastructure diagram from Veeam One.

To do so, you need to perform pre-requisite setup


  • Install Veeam One
  • Add Vmware ESX or Vcenter
  • Add Microsoft Hyper-V Host or System Center Virtual Machine
  • Perform Monitoring for 2 days
  • Add Veeam Backup & Replication Server


After leave Veeam One to monitor & collect information, next step is harvest the result.

On Veeam One Server, you need to install


  • Veeam Report Viewer
  • Microsoft Visio

Next, Open Veeam One Reporter > Workspace > Offline Report > Infrastructure View (Visio)


Select your parameter & click Preview. Save the result (Veeam Report Viewer-vmr). Double click the vmr and wait for compilation to complete. It will open MS Visio app.


You also can view the result from C:\Users\administrator\Documents\My Veeam Reports\

[Sample Output Result]


 Give it a try & test on your environment.